Perfecting Block Changes
On average, a typical PickTrace customer moves between multiple blocks in the same day, multiple times a week. This transition generally occurs near the midpoint of the workday, or on the latter half of the day. Block changes are a necessary part of harvest, so what is the big deal? Poorly executed block changes increases employee turnover and transaction costs (time not spent on task), this is especially true when multiple crews are within the same block.

PickTrace data shows that during apple and pear harvest, most employee turnover occurs after the completion of their first bin or at the change of a block.

Get your crews in order
In order to follow the best practice for block changes, you’ll first need to ensure your crews are organized well and that each crew has a crew leader/checker.
Crews should have:
- 1 Crew Leader
- 1 Checker (+1 after 45 pickers)
- 15–45 Pickers
- Pickers permanently assigned to checkers
- Checkers assigned to rows
The key is consistency & communication. Crews can move between blocks freely, but consistency in the manner of how they handle that process and the communication to other checks/crew leaders is crucial.
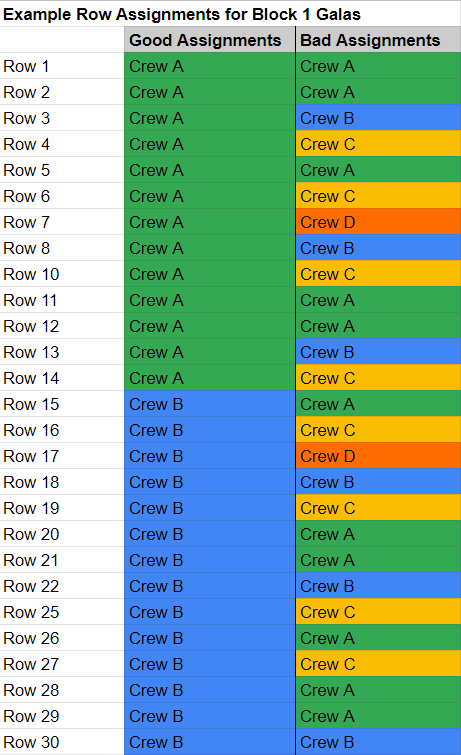
First, organize and assign the crews to specific rows within the block that are consecutive. Too often, multiple crews are assigned within the same block and are given no clear guidance as to which rows belong to which checker or crew. As a result, checkers have immense difficulty identifying which rows belong to their crew members. If you have multiple checkers within your crews, ensure that these assignments are given by checker, instead of by crew.
Right: An example of assigning an appropriate number of rows to a crew/checker, that are consecutive and easy to move between.
When it comes to assigning rows — keep it simple. Use consistent increments, for instance batches of 10: Rows 1–10 belong to Crew A, Rows 11–21 belong to Crew B, 22–33 to Crew C, and so forth. You can also assign crews to the same row, where a crew starts on each end of the row and moves towards the middle, or they can start in the middle and work their way out.
The number of rows assigned might depend on the length of rows and topography; if your ranch is on a hillside you might assign fewer rows.
If you have multiple checkers within a crew, assign the rows to the checkers. For instance, each checker gets 5 rows.
Communication is Key. Your checkers must be able to communicate with each other! They should be informing other checkers and crew leaders (usually by radio) of all block changes or movements of pickers.

The perfect block changes, every time.
Once your crews are comfortable with row assignments, continue assigning rows with each new block. How? The crew leader needs to communicate with your checkers to consistently assign new blocks (the quantity of rows assigned should be the same between blocks!).
Assuming that your crews have 1 crew leader and 2 checkers, and are moving from Block 1 to Block 2 the following should take place:

- The crew leader assigns the checkers a group of rows and communicates this to the checkers.
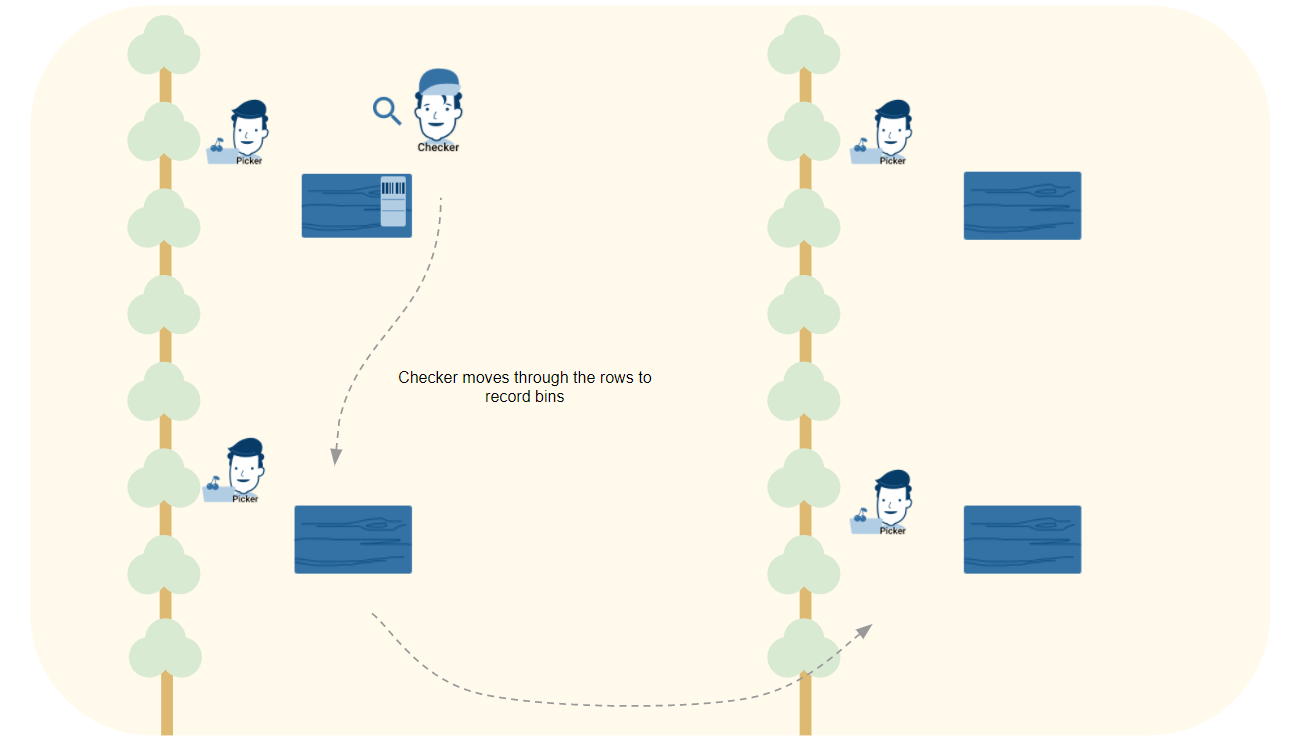
- As pickers complete their rows, the checker sends the picker forward to the next block ahead of themselves and the crew/group.
- Pickers should wait to have their bin scanned and completed before moving to the next block, and should bring their ID with them. You may also instruct your checker to give credit for the last bin in a block ahead of time, even if the bin isn’t full yet. This allows the worker to go straight to the next block once done and not have to wait for the checker.
- The crew leader should tell the first picker moving blocks to go to a specific row if the checker has not communicated this.
- Checkers should stay in the first block and finish all bins before leaving.
- When critical mass starts to build in the next block and more than 30% of the crew (percentage may vary) has moved to the next block with significant speed differences in picking, shift one of your checkers forward to the next block to have them start scanning bins.
- Checkers should be constantly updating each other on where they are via radio.
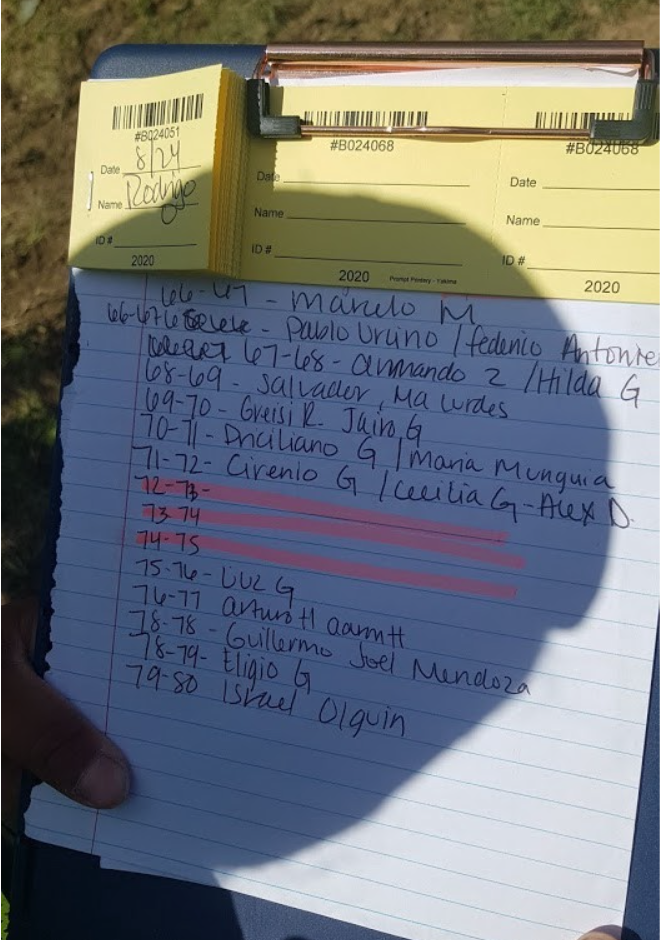
- Checkers should write down the rows assigned, and the pickers who are in them (example below).

Simple Example Scenario
Crew A is in Block 1 with 20 pickers and 2 checkers. Each checker is responsible for 10 pickers and 10 rows. Checker A is in rows 1–10, Checker B is in rows 11–21. The crew leader tells both checkers that once finished with Block 1, they are moving to Block 2.
As the first picker finishes his rows in Block 1 and is ready to move to Block 2, the crew leader should inform the checkers where to send their first pickers in Block 2. At this point, Checker A should be hovering around the fastest picker to ensure they can move to the next block quickly. Once complete, the checker informs the picker where to go, usually this is done through statements like “Move to block 2, row 100 in the northwest corner near the road”.
The checker stays in Block 1, and the first picker moves to the next block, taking their badge with them. This process is repeated.
Above: Each row has the name of the picker(s) that are assigned. A highlighted row means it is completed.
Want specialized guidance? Schedule a meeting!
We take immense pride in making our customers successful. Have questions about how to use PickTrace more effectively? Schedule a meeting with your designated Customer Success Manager!
Not a current customer?
We’d love to speak with you!

